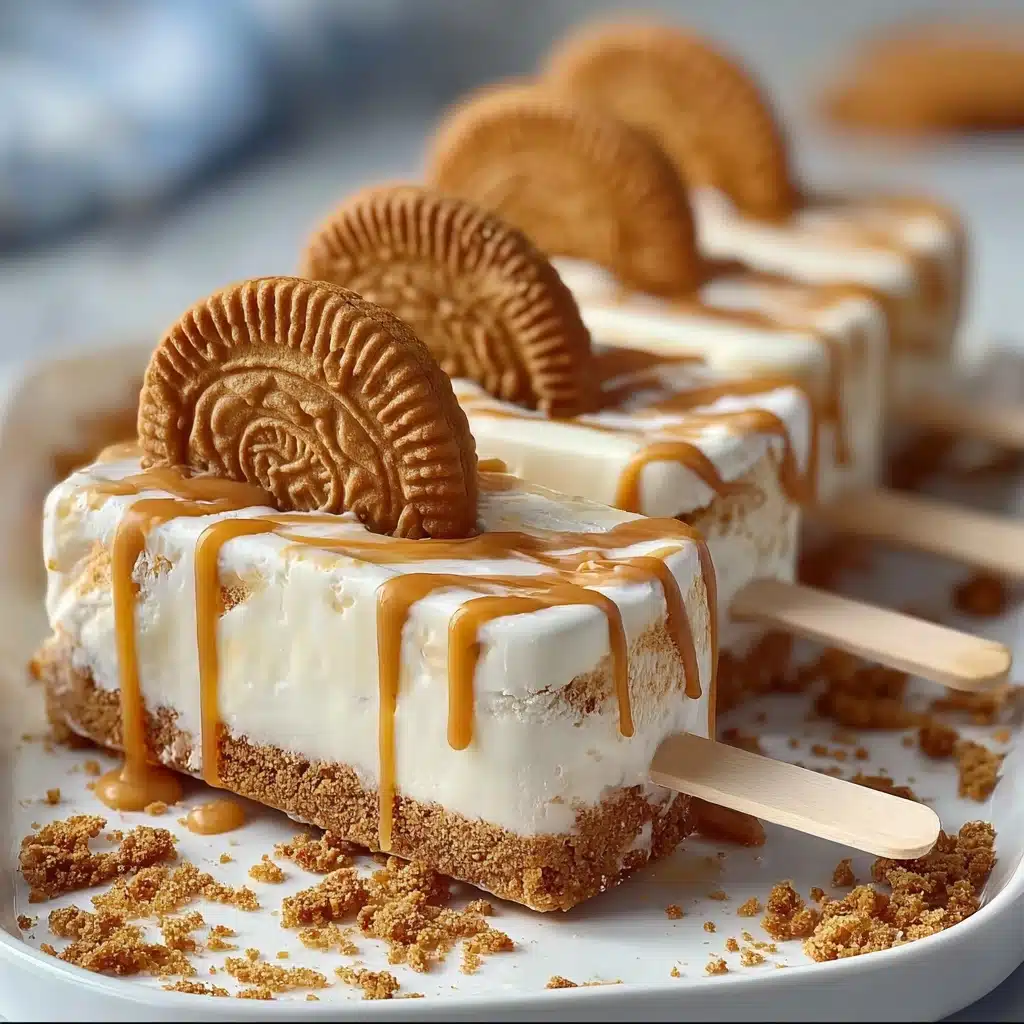
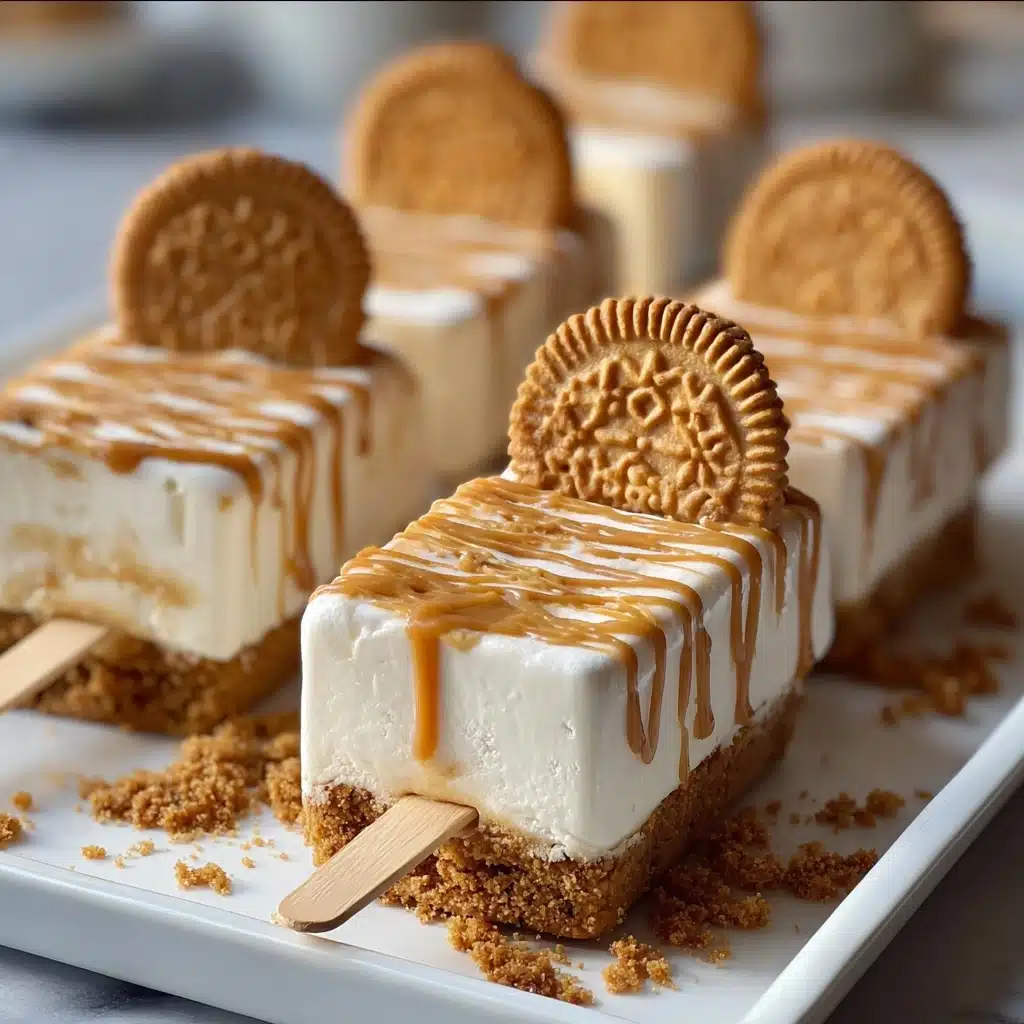
Lotus Biscoff Ice Cream Bars Recipe
If you have a soft spot for the irresistible caramelized flavor of Lotus cookies and the creamy delight of homemade frozen treats, you are going to adore these Lotus Biscoff Ice Cream Bars. This dreamy dessert brings together the rich, spiced notes of Biscoff cookies with a luscious, velvety ice cream texture, creating a refreshing yet satisfyingly crunchy experience. Perfect for warm days or any time you crave a sweet indulgence, these bars will quickly become a crowd-pleaser and a personal favorite that’s surprisingly easy to make at home.
Ingredients You’ll Need
Gathering these ingredients is a breeze, and each one plays a key role in building the irresistible flavor and texture of your Lotus Biscoff Ice Cream Bars. From the buttery cookie base to the fluffy whipped cream mixture, every element contributes depth and creaminess.
- Lotus Biscoff cookies, 20 crushed: The star of the show, providing that signature spiced crunch and sweetness.
- Unsalted butter, 4 tbsp melted: Binds the cookie crumbs into a perfect, firm base.
- Heavy cream, 1 1/2 cups chilled: Whipped to stiff peaks to create the creamy ice cream texture.
- Sweetened condensed milk, 1 cup: Adds richness and natural sweetness without the need for extra sugar.
- Lotus Biscoff spread, 1/2 cup plus 1/4 cup melted: Infuses the whole dessert with that unmistakable caramelized flavor and is perfect for drizzling.
- Vanilla extract, 1 tsp: Enhances all the other flavors with a warm, aromatic note.
- Lotus Biscoff cookies, 4 crumbled (for topping): Adds an extra crunch and visual appeal on top.
- Whole Lotus cookies, 6 (optional garnish): Great for a charming, rustic finish when serving.
How to Make Lotus Biscoff Ice Cream Bars
Step 1: Prepare the Cookie Base
Start by crushing 20 Lotus Biscoff cookies into fine crumbs. Mix the crumbs with 4 tablespoons of melted unsalted butter until the mixture feels sandy and holds together when pressed. This base is what gives your ice cream bars that amazing crunchy texture and buttery flavor. Press this mixture firmly into your ice cream bar molds or a loaf pan, creating an even layer. Pop it into the freezer for about 20 minutes so it sets nicely before you add the creamy layer.
Step 2: Whip the Cream
While the base chills, take your 1 1/2 cups of heavy cream, keeping it well chilled, and whip it in a large bowl until stiff peaks form. This step is crucial because the fluffy whipped cream is what makes these bars so delightfully creamy and light. Be patient and watch the cream transform into a soft, billowy cloud ready to be folded into the Biscoff mixture.
Step 3: Mix the Sweetened Condensed Milk and Spread
In another bowl, combine 1 cup sweetened condensed milk with 1/2 cup Lotus Biscoff spread and 1 teaspoon vanilla extract. This creamy, sweet blend brings rich Biscoff flavor right into the heart of your ice cream. Mix until smooth and luscious, then get ready to bring it all together.
Step 4: Fold Whipped Cream Into Biscoff Mixture
Gently fold the whipped cream into the Biscoff spread mixture. The key here is careful folding so you keep the airy texture intact, creating a perfectly smooth and fluffy ice cream filling. This step turns your ingredients into magic, promising an indulgent bite with every mouthful.
Step 5: Assemble and Freeze
Pour the creamy mixture over your chilled cookie base, spreading it evenly. Insert wooden sticks into the center of each mold or slice of the loaf pan to make handling the bars easy and fun. Cover and freeze the bars for at least six hours or overnight for that perfect solid set. This patience pays off with bars that hold shape beautifully while maintaining a creamy center.
Step 6: Finish with a Decadent Touch
Once your ice cream bars are fully frozen, drizzle the top with 1/4 cup melted Lotus Biscoff spread for an extra hit of that signature caramelized flavor. Sprinkle with crumbled Lotus Biscoff cookies to add a satisfying crunch and texture contrast. If you want to impress guests, garnish with whole Lotus cookies for extra charm and crunch. Your Lotus Biscoff Ice Cream Bars are ready to wow everyone!
How to Serve Lotus Biscoff Ice Cream Bars
Garnishes
Enhancing your bars with simple garnishes makes serving them even more delightful. Crumbled Lotus cookies add texture, while a drizzle of extra Biscoff spread creates a glossy, rich topping. Whole cookies can turn your dessert into a visual centerpiece that’s as attractive as it is delicious.
Side Dishes
Pair your Lotus Biscoff Ice Cream Bars with fresh fruit like sliced bananas or berries to cut through the richness and add freshness. A small dollop of whipped cream or a scoop of vanilla gelato complements their creamy texture beautifully. For adults, a drizzle of coffee or caramel sauce on the side pairs wonderfully.
Creative Ways to Present
Think outside the box by serving the bars on elegant wooden boards lined with parchment, or presenting them alongside a mini jar of Lotus Biscoff spread for guests to add as they please. Wrapping each bar in parchment paper tied with twine makes them perfect for parties or gift-giving. Even layering broken bits of bars in a parfait glass with whipped cream can turn this simple dessert into an eye-catching treat.
Make Ahead and Storage
Storing Leftovers
Leftover Lotus Biscoff Ice Cream Bars should be stored in an airtight container in the freezer to preserve their freshness. Keeping them well sealed prevents freezer burn and preserves that creamy texture and crunchy base.
Freezing
Because these bars are made to be frozen, they hold up wonderfully in the freezer for up to two weeks. Just be sure to keep them tightly covered or wrapped to avoid them absorbing any unwanted odors or developing ice crystals.
Reheating
Since these are frozen treats, reheating is not necessary and will ruin their texture. Let the bars sit at room temperature for 5 to 10 minutes before serving to soften them slightly for easier biting and enhanced creaminess.
FAQs
Can I use a different cookie instead of Lotus Biscoff cookies?
While you could try other spiced or caramel-flavored cookies, Lotus Biscoff cookies offer a unique flavor and texture that define this recipe. Swapping them may change the character and taste of the ice cream bars.
Do I need an ice cream maker to make these bars?
No ice cream maker is needed for these bars! The whipped cream and sweetened condensed milk create a creamy texture without churned ice cream, making this a wonderfully easy no-churn dessert.
Can I make these bars without dairy?
The recipe relies on heavy cream for texture, but you could experiment with coconut cream or other thick, dairy-free creams for a vegan alternative. Just be aware that the texture and taste may be slightly different.
How do I prevent the cookie base from becoming soggy?
Pressing the cookie crumb and butter mixture firmly, then freezing it before adding the ice cream layer helps create a sturdy base. Also, avoid letting the bars sit at room temperature too long before serving.
Can I double the recipe for a larger batch?
Absolutely! Just make sure you have sufficient molds or pans, and increase freezing time slightly if your containers are larger or deeper than usual. This recipe scales up very well.
Final Thoughts
These Lotus Biscoff Ice Cream Bars are a delightful treat that combines nostalgia, creamy indulgence, and that signature spice-sweet crunch we all crave from Biscoff. Whether you’re serving them at a summer gathering or indulging in a cozy night at home, they’re guaranteed to bring smiles and second helpings. Trust me, once you try making these bars, they’ll become a beloved staple in your dessert repertoire—give them a go and enjoy every luscious bite!
PrintLotus Biscoff Ice Cream Bars Recipe

These Lotus Biscoff Ice Cream Bars are a luscious homemade treat featuring the iconic caramelized flavor of Biscoff cookies and spread. With a crunchy cookie base and creamy, dreamy ice cream filling, topped with drizzled Biscoff spread and cookie crumbles, these bars are an irresistible dessert perfect for warm days or any time you crave a sweet, indulgent snack.
- Prep Time: 15 minutes
- Cook Time: 0 minutes
- Total Time: 6 hours 15 minutes (includes freezing time)
- Yield: 8 ice cream bars 1x
- Category: Dessert
- Method: No Bake, Freezing
- Cuisine: American
- Diet: Vegetarian
Ingredients
Base
- 20 Lotus Biscoff cookies, crushed
- 4 tbsp unsalted butter, melted
Ice Cream Filling
- 1 1/2 cups heavy cream, chilled
- 1 cup sweetened condensed milk
- 1/2 cup Lotus Biscoff spread
- 1 tsp vanilla extract
Toppings
- 4 Lotus Biscoff cookies, crumbled
- 1/4 cup melted Lotus Biscoff spread
- 6 whole Lotus cookies (optional garnish)
Instructions
- Prepare the base: Crush the Biscoff cookies into fine crumbs and mix them thoroughly with the melted butter until the mixture has a sandy texture. This will create a firm and flavorful crust for your ice cream bars.
- Form and freeze base: Press the cookie and butter mixture firmly into ice cream bar molds or a loaf pan to form an even base layer. Place it in the freezer for 20 minutes to set firmly.
- Whip the cream: In a large mixing bowl, whip the chilled heavy cream using a hand mixer or stand mixer until stiff peaks form, which means the cream holds firm shapes without collapsing.
- Mix condensed milk and Biscoff: In a separate bowl, combine the sweetened condensed milk, Lotus Biscoff spread, and vanilla extract. Stir until smooth and fully blended.
- Fold cream and Biscoff mixture: Gently fold the whipped cream into the Biscoff mixture using a spatula. Carefully combine until smooth and uniform without deflating the cream.
- Assemble bars: Pour the creamy Biscoff mixture over the frozen cookie base in the molds. Insert wooden sticks into the center of each mold or the loaf pan to create handles.
- Freeze completely: Place the assembled bars in the freezer for at least 6 hours or preferably overnight until they are completely solid and ready to eat.
- Add toppings: Once frozen, drizzle the melted Lotus Biscoff spread over the tops of the bars. Sprinkle crumbled Biscoff cookies over the drizzle for added crunch and flavor.
- Garnish and serve: Optionally, garnish the bars with whole Lotus cookies for a decorative and tasty finishing touch before serving.
Notes
- Use chilled heavy cream for best whipping results.
- Press the base firmly to avoid cracks when unmolding.
- For easier removal, briefly dip molds in warm water before unmolding the bars.
- Store leftover bars covered in the freezer to maintain texture and freshness.
- These bars are rich and sweet; adjust sweetness by varying the amount of sweetened condensed milk if desired.
Nutrition
- Serving Size: 1 ice cream bar
- Calories: 330
- Sugar: 25g
- Sodium: 90mg
- Fat: 22g
- Saturated Fat: 14g
- Unsaturated Fat: 7g
- Trans Fat: 0g
- Carbohydrates: 28g
- Fiber: 1g
- Protein: 4g
- Cholesterol: 70mg
Keywords: Biscoff ice cream bars, Lotus Biscoff dessert, no-bake ice cream, homemade ice cream bars, easy frozen dessert