Heart Shaped Raspberry Cheesecake Brownies Recipe
Introduction
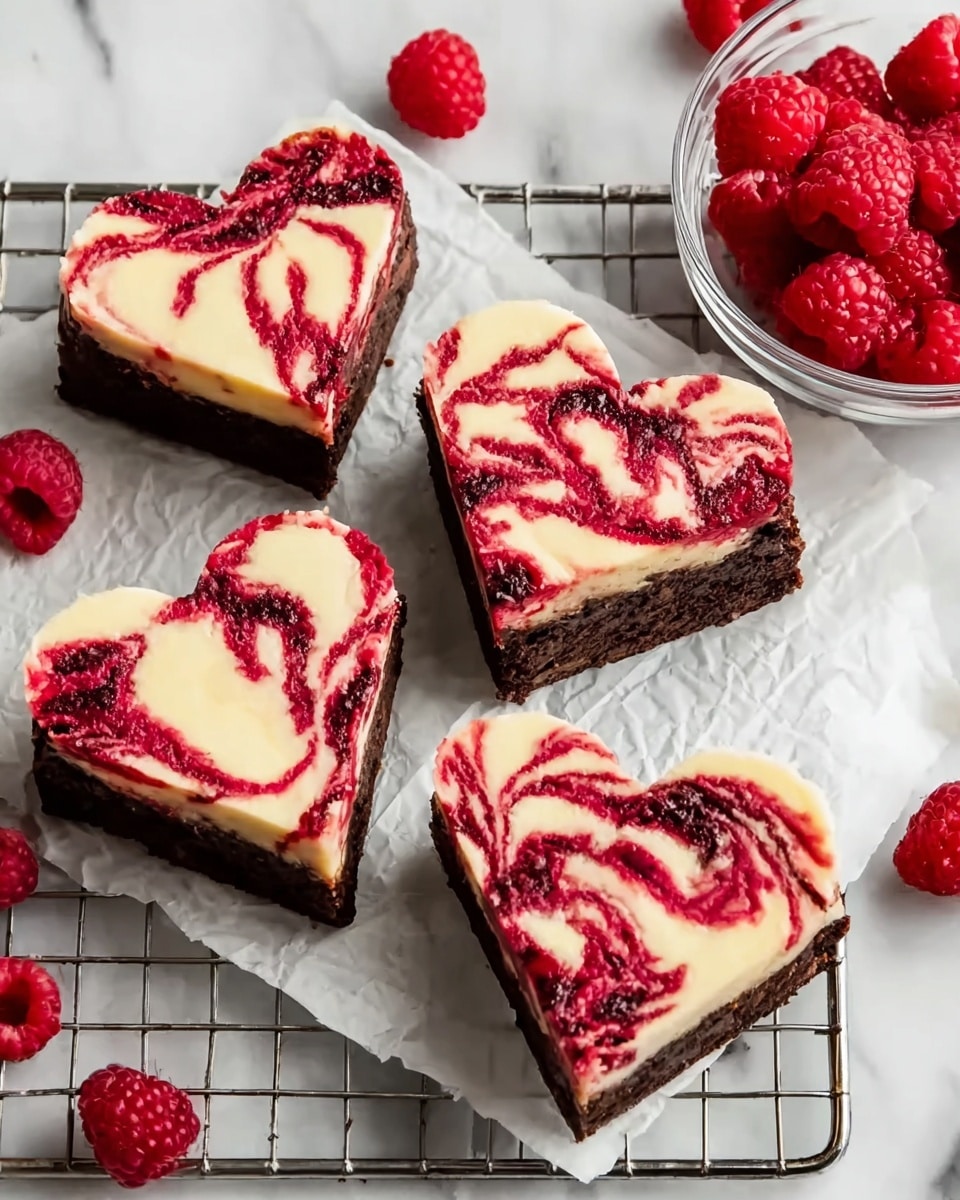
These Heart Shaped Brownies combine rich chocolate with creamy cheesecake and a bright raspberry swirl. Perfect for a special occasion or a sweet treat, they impress with their delightful layers and beautiful presentation.
Ingredients
- 1 cup raspberries (fresh or thawed frozen)
- 1 tablespoon granulated sugar
- 1 teaspoon vanilla extract
- 8 oz cream cheese, room temperature
- ⅓ cup granulated sugar
- 1 large egg, room temperature
- ½ teaspoon vanilla extract
- 1 cup all-purpose flour (or gluten-free blend)
- ¾ cup Dutch-process cocoa powder, sifted
- ¼ teaspoon salt
- ¾ + 2 tablespoons refined coconut oil or neutral oil
- 1 ½ cups granulated sugar
- 1 tablespoon vanilla extract
- 3 large eggs, room temperature
Instructions
- Step 1: In a small saucepan, simmer raspberries, 1 tablespoon sugar, and 1 teaspoon vanilla extract over medium heat for 5–8 minutes until thickened. Strain the mixture through a fine sieve to remove seeds. Set the raspberry sauce aside to cool.
- Step 2: In a bowl, beat the cream cheese and ⅓ cup sugar until smooth. Add 1 egg and ½ teaspoon vanilla extract, then mix until creamy and well combined.
- Step 3: In a separate bowl, whisk together the flour, sifted cocoa powder, and salt. In another large bowl, combine ¾ cup plus 2 tablespoons oil, 1 ½ cups sugar, and 1 tablespoon vanilla extract. Add the eggs one at a time, mixing well after each addition.
- Step 4: Gently fold the dry ingredients into the wet ingredients until just blended—avoid overmixing to keep the brownies tender.
- Step 5: Line a baking pan with parchment paper and spread the brownie batter evenly. Pour the cheesecake mixture over the batter, then spoon the raspberry sauce on top. Using a skewer or toothpick, swirl the cheesecake and raspberry sauce gently to create a marbled effect.
- Step 6: Bake in a preheated 350°F (175°C) oven for 30–35 minutes, or until the edges are set and a toothpick inserted near the center comes out with a few moist crumbs.
- Step 7: Allow the brownies to cool completely at room temperature, then chill in the refrigerator for at least 2 hours to firm up for easier cutting and serving.
- Step 8: Use a heart-shaped cookie cutter to cut the brownies into heart shapes. Serve chilled or at room temperature.
Tips & Variations
- Use fresh raspberries when in season for the best flavor, or frozen raspberries thawed completely if fresh aren’t available.
- For a dairy-free option, substitute cream cheese with a plant-based cream cheese alternative.
- To add extra texture, sprinkle chopped nuts or chocolate chips into the brownie batter before baking.
- If you prefer a more intense chocolate flavor, use a combination of Dutch-process and natural cocoa powder.
Storage
Store the brownies in an airtight container in the refrigerator for up to 4 days. They can also be frozen for up to 3 months; thaw in the refrigerator before serving. For best texture, serve chilled or briefly bring to room temperature before enjoying.
How to Serve

Serve this delicious recipe with your favorite sides.
FAQs
Can I use frozen raspberries directly without thawing?
It’s best to thaw frozen raspberries before using to ensure the sauce cooks evenly and thickens properly without excess water.
How do I know when the brownies are done baking?
The edges should be set and starting to pull away from the pan, while the center will still be slightly soft. A toothpick inserted near the cheesecake swirl should come out with a few moist crumbs but not wet batter.
PrintHeart Shaped Raspberry Cheesecake Brownies Recipe

Delight in these luscious Heart Shaped Brownies featuring rich cocoa brownie layers topped with creamy cheesecake and a vibrant raspberry swirl. Perfectly balanced with sweet and tart flavors, these decadent treats are baked to perfection and chilled for a refreshing finish, making them ideal for special occasions or romantic celebrations.
- Prep Time: 20 minutes
- Cook Time: 35 minutes
- Total Time: 2 hours 55 minutes
- Yield: 12–16 heart-shaped brownies 1x
- Category: Dessert
- Method: Baking
- Cuisine: American
- Diet: Vegetarian
Ingredients
Raspberry Sauce
- 1 cup raspberries (fresh or thawed frozen)
- 1 tablespoon granulated sugar
- 1 teaspoon vanilla extract
Cheesecake Layer
- 8 oz cream cheese, room temperature
- ⅓ cup granulated sugar
- 1 large egg, room temperature
- ½ teaspoon vanilla extract
Brownie Batter
- 1 cup all-purpose flour (or gluten-free blend)
- ¾ cup Dutch-process cocoa powder, sifted
- ¼ teaspoon salt
- ¾ cup + 2 tablespoons refined coconut oil or neutral oil
- 1 ½ cups granulated sugar
- 1 tablespoon vanilla extract
- 3 large eggs, room temperature
Instructions
- Prepare Raspberry Sauce: In a saucepan over medium heat, combine raspberries, sugar, and vanilla extract. Simmer for 5 to 8 minutes, stirring occasionally, until the mixture thickens. Remove from heat, strain through a sieve to remove seeds, then set aside to cool.
- Make Cheesecake Mixture: Beat cream cheese and sugar together in a mixing bowl until smooth and creamy. Add the egg and vanilla extract, then mix again until fully blended and creamy.
- Mix Dry Ingredients: In a separate bowl, whisk together the all-purpose flour, sifted cocoa powder, and salt until evenly combined.
- Combine Wet Ingredients: In another bowl, mix the refined coconut or neutral oil with sugar and vanilla extract. Add the eggs one at a time, whisking well after each addition.
- Blend Batter: Gradually add the dry ingredient mixture to the wet ingredients, folding gently until just combined. Avoid overmixing to keep the brownies tender.
- Assemble Brownies: Line a baking pan with parchment paper. Spread the brownie batter evenly on the bottom. Pour the cheesecake mixture over the brownie batter. Spoon the raspberry sauce on top and gently swirl it using a skewer or knife to create a marbled effect.
- Bake: Preheat the oven to 350°F (175°C). Bake the assembled brownies for 30 to 35 minutes or until a toothpick inserted near the center comes out with a few moist crumbs but not wet batter.
- Cool and Chill: Remove from the oven and allow the brownies to cool completely at room temperature. Then chill in the refrigerator for at least 2 hours to set the cheesecake layer.
- Serve: Once chilled, cut the brownies into heart shapes using a cookie cutter. Serve chilled or at room temperature for a delightful treat.
Notes
- Use room temperature ingredients for better mixing and texture.
- Ensure the cheesecake layer is fully chilled before cutting to prevent cracking.
- Substitute raspberry sauce with other fruit sauces for variation.
- Use a non-stick or parchment-lined pan for easy removal.
- Store brownies in the refrigerator for up to 5 days.
Keywords: heart shaped brownies, raspberry cheesecake brownies, chocolate brownies, dessert, valentine’s day dessert, raspberry swirl brownies